The Complete Guide to Google Shopping Ads
In recent years, with the popularity of online shopping, more and more online stores have been established. Many physical stores have also launched online platforms for customers to purchase, such as PARKnSHOP, HKTV mall, Adidas, etc., and the consumption patterns of customers are also changed. Due to the epidemic situation, they are more keen to buy products online. Online shopping has undoubtedly become the current market trend and competition among stores has become increasingly fierce. Online stores are using a variety of advertising formats to help promote sales and Google Shopping Ads is definitely one of the most popular advertising formats among it.
What is Google Shopping Ads?
When users are searching for products they are interested in such as Adidas NMD (as shown below), Google Shopping ads will appear on the search results page.

Each Google Shopping Ad includes an image, product title, price, name of the retailer and sometimes some retailer-specific information like shipping costs or reviews. It allows the audience to compare and shop for products across different retailers who have advertised their products on it.
The best thing for E-commerce stores is the audiences will be directed to that product page right after they click on the Shopping Ads. It could help increase the conversion rate since it shortens the customer journey by landing audiences to the specific product page, instead of home page or category page that audience needs more time to play around the website, where it lowers the conversion rate likely.
Where do the Shopping ads appear?
Google shopping ads will be shown on top of or next to the search result (separate from text ads) and the google image.


It will also appear in Google Search Partner websites and The Google Display Network, which includes YouTube, Gmail, and Google Discover.
Why use Google Shopping Ads?
1. Eye-catching position in search results
Google Shopping Ads appear at the top of the search engine result pages (SERP), above search ads and organic results. This visual format can attract most of the clicks which help to boost the traffic and drive the audience to purchase your products. It is a good way for you to increase brand exposure as the online visibility of your brand increases.
2. Reach the potential customers precisely
Google Shopping Ads will be shown based on the audience’s search terms which means your products will be displayed to the audience who are already interested or familiar with what you sell. Thus, their purchase intention is relatively higher. When they click the ads, they will reach the product page directly and this can facilitate the shopping process. This also provides a chance for them to explore your website and become a repeat customer.
3. More visual touch than text ads
Shopping ads show the product image, title, price, brand name and even a short description of your products. These ads give the audience a strong sense of the product you are selling before they click the ad, they’re less likely to bounce. Shoppers who don’t recognize your brand name are still likely to click your ad based on the image, rating, and price. This can help acquire new customers.
4. Broader reach with Google Shopping Ads
More than one of your Shopping ads can appear for a given user search. Also, Shopping ads can appear at the same time as text ads if the keywords are relevant. It could provide access to the audience to browse a full variety of products that match their search such as ads for sports shoes and text ads for sports equipment. This means your reach with shoppers for a single search could be doubled.
Google Shopping Ads Setup
Step 1: Create a Google Merchant Center (GMC)
The first thing we have to do is to create a Google Merchant Center. Fill up the basic information that it requires you to do so. Verify the GMC according to the methods provided. Google Merchant Center is a Google’s platform that gets your store and products available to the shoppers online when they search on Google properties. It is a total free tool and easy to use. Follow our steps and you will get it done without hassle.
Step 2: Create a Product Feed on Google Merchant Center
Once we have verified the domain and gotten everything set up, the next step is to upload products to Google Merchant Center. There are 2 ways to upload products to GMC and they are automatic upload and manual upload. Literally we can use API to automatically upload and update products to GMC from the website, OR we manually upload and update products in bulk using an excel sheet

Click on Products, then choose feeds.

Select the country of sale. If your shopping campaign targets Hong Kong, then you may select Hong Kong in the Country of sale. If you target Malaysia, then select Malaysia. Bear in mind that your products have to be available to ship to the whole country, or else your GMC account will be disabled.
For Language, just select the language of your product feed. If you have an English product, then you may select English. Language mismatch of the feed and language chosen here may lead to disapproval.

Here is the step 2 of creating and uploading the product feed. There are several ways to upload the product feed to GMC. Mainly we will be demonstrating Google Sheets and Scheduled Fetch. Google Sheets is served as manual upload and scheduled fetch is automatic upload. Firstly, Key in the primary feed name: “All products – English”
Manual Upload: Google Sheets
If your website is not supporting content API or any plugin (like Shopify or WooCommerce), or you only have a few products that you don’t have to spend too much time on building up a product feed, using Google Sheets to upload manually is your choice!
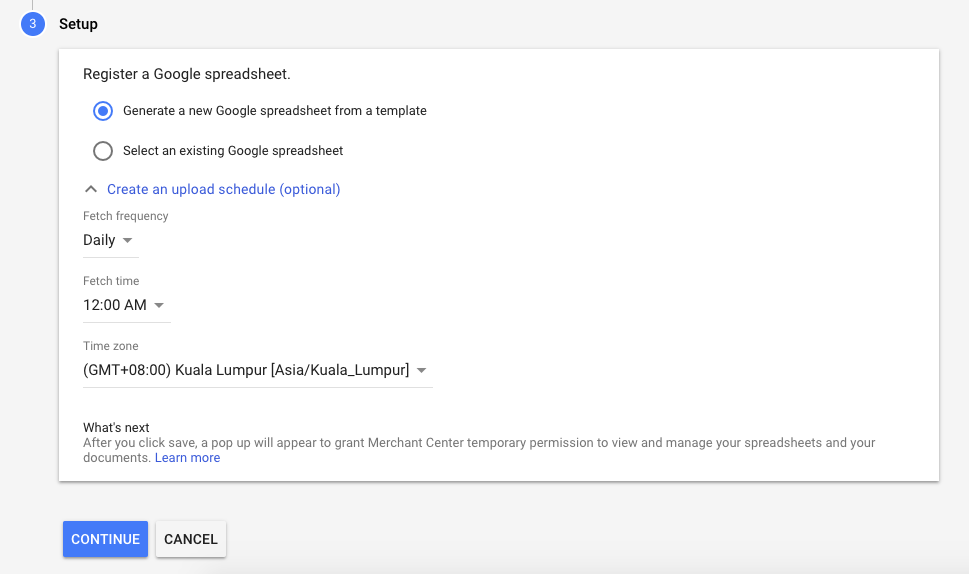
If you already have built up a product feed, you may choose “Select an existing Google spreadsheet”. Or if you are completely new, you can “generate a new Google spreadsheet from a template”. It will require you to log into your Google Drive.

You will see your feed is created and we can click on Google Sheets “open”.
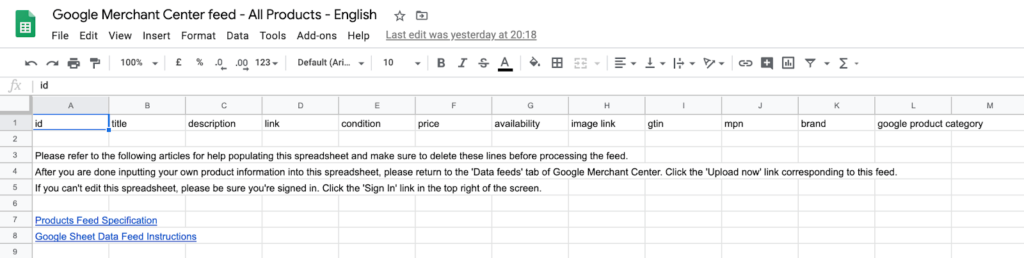
After you click on that Google Sheet, you will find out there is an excel sheet that requires us to fill in a bunch of data. These data are the product details that we have to handle. You may follow the instructions to input the required fields. ID is unique for each product and there are 2 important fields that you have to plan carefully and they are title and description. It will affect the ad rank of Google Shopping Ads as these are serving like Ad Relevance in Quality Score.
Also, you will have to input the google product category correctly to each sku that you have to upload. Click here to check all the available product categories. To understand all the attributes on the feed, click here to read and check all information you need before you proceed. If there is any product update, ilke in stock / price / quantity, you will need to update the product feed here and REFETCH again to notify Google Merchant Center.
Automatic Upload: Google Sheets
Upload manually costs tons of times so we do recommend an automatic upload. If you are using WooCommerce or Shopify (or sitegiant in Malaysia) to build your website, you can manage to upload all your feeds with no hassle.

After clicking on “Scheduled Fetch”, you will have to set up the details. The best thing of using automatic upload or Scheduled Fetch is the product feed is synchronising with products on the website. If there is any change or edit on the website, we don’t need to update anything on the product feed.
I will name File name to “Shop Auto Sync”. Fetch frequency is how frequent you want Google Merchant Center to re-fetch your product feed. Normally I will just remain Daily at 12:00am. The most important thing here is to input the FILE URL here. With the help of plugin, we can get a url here and this url contains the whole product feed here. Example below is a Shopify’ case

There are lots of plugins / apps that can generate a product feed but personally I think Google Shopping Feed is one of the best, easy to use and very reasonable price

After you install the app, click on it and it will direct you to a panel

We are not doing an advanced campaign structure at the moment, but instead we want to build up a simple campaign with all products. You may take a reference of each button in the panel but the most important part is to “Save and Regenerate the Feed” after you do any changes. Then we can copy URL and insert to Google Merchant Center – File URL. Secondly, click on create feed. Finally, you will see a feed is created.

Bear in mind that you can click into your feed and click on “Fetch Now”. The feed will be run and all you need to do is wait for 1-2 days to get all the products fetched as below.

You will be seeing your products here. All IDs, prices, condition, availability and all other attributes are shown here. If there are any disapproved products, you can check on Diagnostics where you can find any issues of products, feeds and GMC account level.
Writing Powerful Google Shopping Product Titles
For shopping campaigns, the main factors to get a high rank are biddings and keywords. Biddings are very understandable but for keywords, we have to put it nicely into our title and description. There are lots of good guidelines on the internet available. You may check out the optimization tips below
Step 3: Connect Google Merchant Center with Google Ads Account
After you have done your product feeds, the next step is linking up Google Merchant Center with Google Ads Account.

If the GMC email address has a google ads account, then press Create Account. If not, you have to link up a Google Ads account. Key in Google Ads CID after pressing “Link Account”
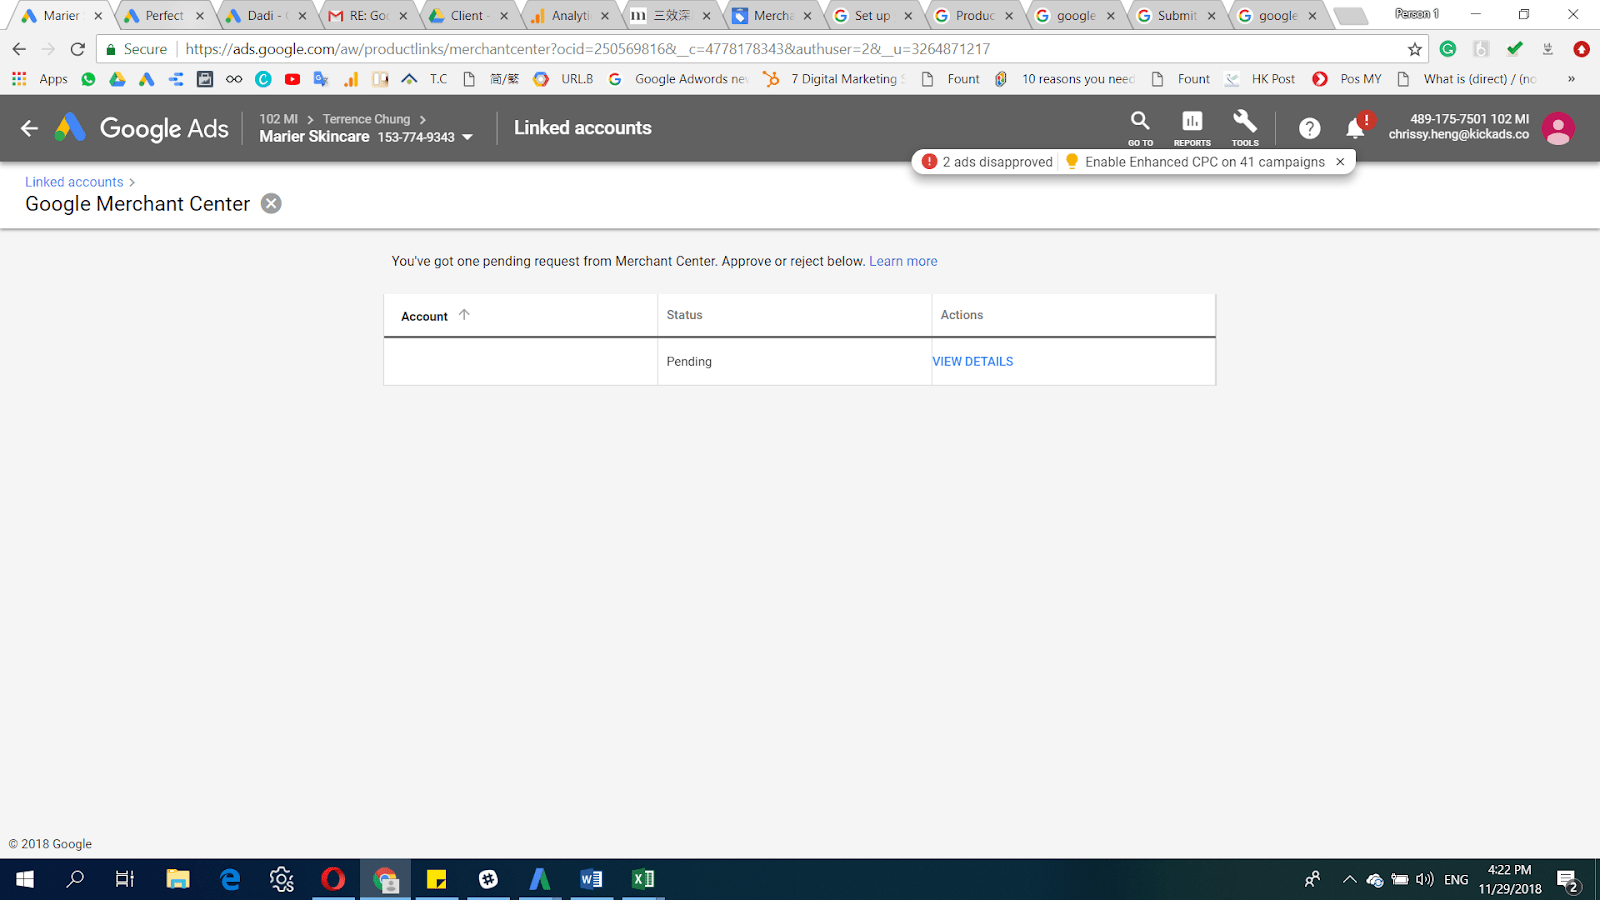
Do remind you to log into your Google Ads account and approve the GMC link up access. Then the preparation works are all done.
Step 4: Setting up Google Shopping Ads
Here comes to the final part of Google Shopping. You may log in to your Google Ads account first and create a new campaign.

Same as setting up search campaigns, we select “Create a campaign without a goal’s guidance” and select Shopping campaign. Remember to select the Merchant Center account correctly and select the country where products are sold.

Campaign Type 1: Smart Shopping Campaign
Smart Shopping Campaign is launched in 2019 and Google has utilized all Google channels to show Shopping Ads. You may watch the video below to get a clearer picture.

It is a very automated campaign that Google will utilize her database and machine learning to deliver the ads to the right shoppers at the best time. The ads will be showing cross all channels, Search, Display Network, YouTube & Gmail.

Here is the setup of the Smart Shopping Campaign. We can firstly input the campaign name and budget as you wish. For bidding, we can only use 1 automatic bid strategy – Maximize conversion value. And we can even set your Target ROAS to your desired conversion return. If you are not familiar with the bidding strategies, you can read our article <<Google Ads Bidding Strategy Explained (Manual or Automated?)>> to understand more!

After selecting Product groups, you will be able to see the ad previews on the right hand side. In our case, we only have 1 product group and it is All products.

Also, you may input the required information like images, headlines, and descriptions. These will enable us to have a responsive display ad with product feed, as in you can see there are product details in the display ad. This serves as display banner ad appearing in Google Display Network.
However, I don’t really recommend you to use Smart Shopping Campaign!!!!
Yes! We really do not recommend any to use the “SMART” shopping campaign. Google is telling advertisers to use this kind of shopping campaign because it is very easy to set up and you have a chance to be exposed in Gmail, Display & YouTube. However, if you have tried remarketing display ads with or without product feed, the performance is below expectation even though the ctr and conversion rate is slightly better than non-remarketing display ads. With Smart Shopping Campaign, you have no right to choose where you want your ads to appear and we can assume that some of the budget will go to display network which causes a less ideal performance
Second, it only allows us to bid with “maximize conversion value” with/without ROAS from the beginning. We have no control to change our bidding (see the importance of bidding strategies). If you have zero knowledge of Google Ads, you can let the system run for you. However, the conversion value / E-commerce tracking must be set up correctly.
The last thing is Smart Shopping Campaign does not provide search terms and audience data. It leaves you no clue to optimize your campaign like Smart Campaign. Based on all these reasons, we don’t recommend to start Smart Shopping Campaign
Campaign Type 2: Standard Shopping Campaign
We have discussed the setup and disadvantages of the smart shopping campaign. Let’s talk about the set up of the standard shopping campaign now!
Like how we set up a normal campaign. We can choose Manual CPC first but I won’t suggest to tick “Help increase conversions with Enhanced CPC”. The major reason is we want to fully control each average cpc. With Enhanced CPC, bidding is not totally under your control. For details, you can read this article Google Ads Bidding Strategy Explained (Manual or Automated?)

For campaign priority, we would choose Low if we only have 1 Google Shopping campaign
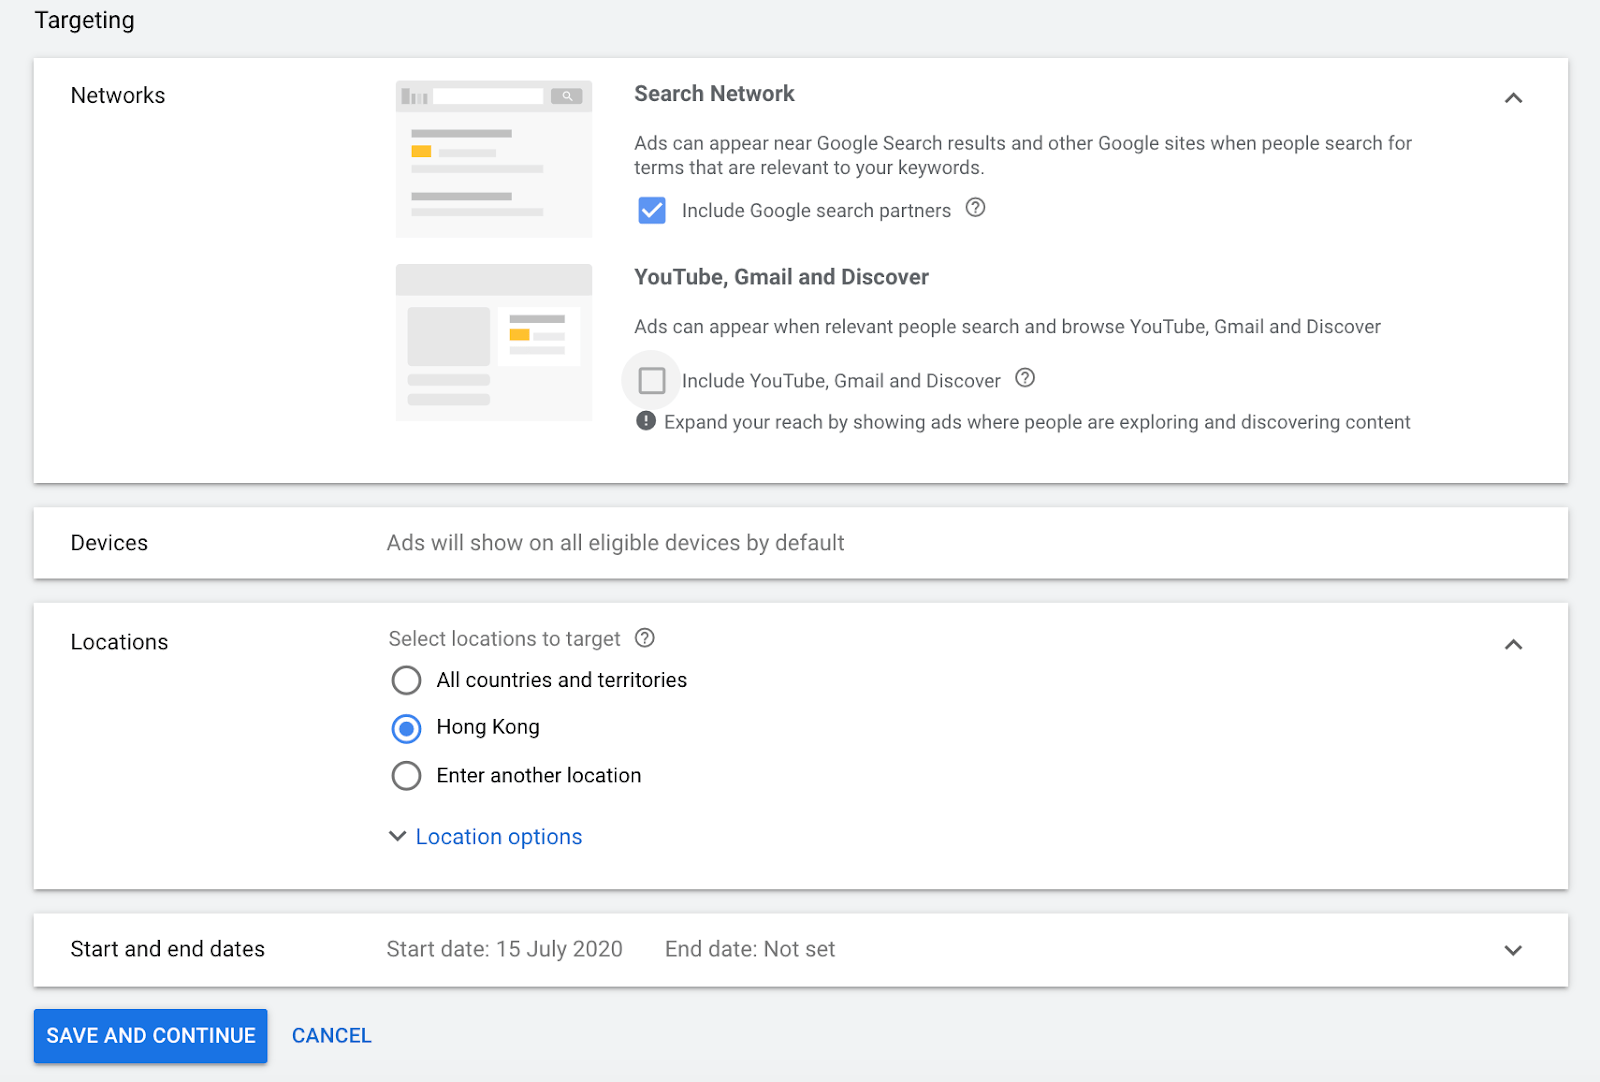
The next one is about Networks and this is the MOST IMPORTANT. Since we only want my shopping ads to appear on search network only, we should uncheck YouTube, Gmail and Discover so that the ads can only be found on Google Search Result only. After choosing your devices and locations, just click on Save and Continue.
Here comes the second part of the standard shopping campaign. There are 2 ad formats available and they are Product Shopping & Showcase Shopping. You may see the screencap below

If we go for Product Shopping, simply fill up the ad group name and enter the cost-per-click bid. Then it will do and the ad format is shown as below

However, you may consider to use showcase shopping ads where it shows the company profile instead of a single product. When we click on the showcase and it brings us to the company profile with the collection of products. It gives more engagement and more opportunities to promote the brand, even if it is a generic search term. You as refer the screenshot below:

Instead of entering cpc only, we will need to create an ad and input some details like headlines and descriptions. Plus, we have to upload header images also. Whatever we upload to the panel, it will be immediately reflected on the preview. Once you finish configuring the ads, just save and it is all good to!

Tips to optimize your Google Shopping Ads
1. Select appropriate targeting network
Besides google search engine, google shopping ads would also appear in Google Search Partner and YouTube, Gmail, and Discover. The ads will pop up while you are browsing another website or watching the video on YouTube.
Placing ads on these network platforms can help to promote brand awareness while for boosting sales and clicking rate, through Google Search Page may have better performance. Thus, you should consider your marketing strategy to allocate the budget on various platforms.
2. Using precise product title
Google Shopping Ads will be shown by matching the product name and description with the audience searched keywords. By using precise and simple keywords to describe the products, it could enhance the matching probability and to boost the click through rate.
You may consider including brand name in the description. Not only to increase brand awareness but also enhance the customer confident towards the products. Especially if your brand awareness is high such as Nike, Adidas, it can help increase the ad exposure as well.
3. Setting up competitive pricing strategies
When the audience search for the products, lots of shopping ads will be shown including your competitors’ one. Google will sort the products by default which depends on the clicking rate from highest to lowest.Low click through rate may indicate your offer is less attractive than your competitors as most of the time the product with lower price would have the advantage on the product feed. Therefore, monitor the pricing strategies of your competitors and adjust the price flexibility can help to increase the click through rate of the ad. For example, offer free shipping, buy one get one free etc.
4. Make use of negative keywords
Although Shopping Ads do not use keywords to target your ads, you can still use the negative keywords to prevent your Ads from appearing in the category you do not want to. It could help to prevent wasting the budget to the irrelevant audience.
Conclusion
Google Shopping Ads is a highly effective way for e-commerce businesses. It could stimulate and facilitate the shopping process and boost your website traffic. Especially for small businesses, the customer can reach your website and purchase your products even though they are not familiar with your brand. Therefore, it can enhance your brand awareness as well.
Ready to grow with Google Ads?
KickAds is a certified Google Partner agency in Hong Kong. We manage paid media for HK & Malaysia SMBs — data-driven, ROI-focused.
Google Ads Management for E-Commerce HK →Performance Max — Shopping + Search + YouTube →