
If you have landed here, then the reason is Google Tag Manager. Wondering what this is? Why should you give it a damn? Then this new year, Kickads is bringing you this Quick Google Tag Manager Guide. This Guide provides you with a basic understanding of Google Tag Manager. If you are looking for something so advanced, this guide may not be very ideal to you. High Recommended to read Simon Ahava ‘s Blog, He is a REAL DEAL in Google Tag Manager (GTM).
Before jumping right to the point- Happy Chinese New Year! May this new year gives you bundles of traffic to your website. I hope you have enjoyed the Chinese new year as much as you enjoy our guides!
What is Google Tag Manager?
Google Tag Manager is a tool created by Google that enables you to create and control tags on a user interface without writing complicated code whenever you want to create a tag. It just lets you embed the GTM code into each page of your website, which eliminates the pain point of the manual process of creating tags and makes your marketing and tracking more effective and productive.
Primarily GTM is used for managing and tracking visitor’s behavior on the website, and Google allows you to use it for free.
Isn’t it Amazing?
Why you need Google Tag Manager?
Google Tag Manager does many things: primarily, you don’t need developers to code for you. Earlier, when GTM didn’t exist, webmasters had to insert code on their pages for every tracking and advertising service. They even need to insert code into elements like links and buttons to track user behavior. But with GTM, the only code you need to add to your page is the GTM code. It eliminated the burden of coding, which allows developers to focus on other tasks.
GTM supports Faster Loading and improves the SEO performance of your site. With GTM, you can streamline All different codes, which means that tags will no longer bogged down and slow your pages from loading.
It’s a great tool that you surely want to try for yourself before concluding whether it’s a perfect fit or not. Maybe you already have a tagging method in place, or you have not felt the need for your website.
But Google Tag Manager is free, so you can try it out practically risk-free.
Here in this article, we will show you how to set up an account, how to create a new tag, how to use Google Tag Manager with your Google Analytics account.
After reading this article, you can decide whether it’s the best tool for your business or not.
Key Advantages Of Google Tag Manager
GTM Boosts Business Efficiency
Google Tag Manager eradicates the need for developers and allows you to understand your user behavior. It is a cost-effective and reliable solution that helps businesses adapt to the evolving marketing conditions and enable you to try various strategies for your business by understanding in-depth user behavior.
Google Tag Manager Boosts the Website Speed
GTM tags are used asynchronously, which means that if a tag is slow loading, then it will not prevent other tags from being fired.
Centralized Tag Management
GTM allows you to manage all marketing and analytics tags used on your site in one place. It improves the efficiency of tag management and simplifies the process of adding, removing, or editing the tags.
Google Tag Manager Simplifies Event/Advanced Tracking
Event tracking is an area where Google Tag Manager can shine. Before introducing GTM, if you needed to track events such as clicks on various buttons and play on your videos, then you require to take help from a developer to add the tracking code for every event. But GTM resolves that pain point. To find out how to click on the link below:
https://www.kickads.co/event-tracking-via-google-tag-manager-and-google-analytics/
How to Set Up an Account in Google Tag Manager?
Setting up a free account is very easy and a simple two-step process, but it’s different from Google Analytics or Gmail accounts. To secure an effortless set-up for you, we’ve recorded our process for setting up an account.
- Just hit on https://www.google.com/analytics/tag-manager and click on ‘Sign Up for Free.’ Then, insert your account name, country, and website URL as well as where you want to use Google Tag. Once you have done this, then click on the Create button.
- In the next step, you will get the codes and instructions to embed the code in the <head> of your page, and the other after opening <body> tag. Apply the codes to your site, once you do this press ‘Ok.’
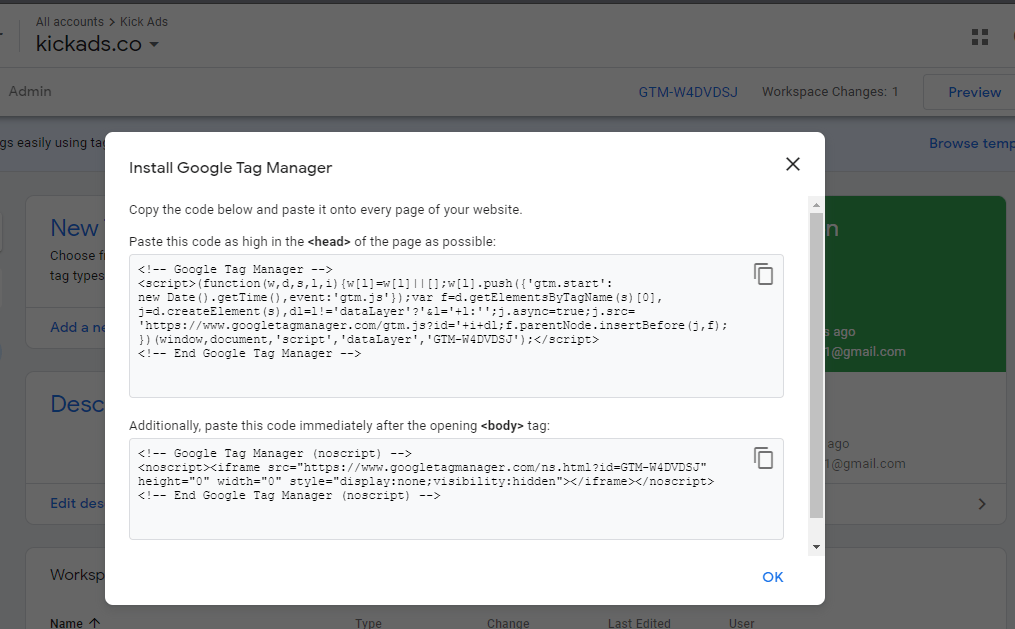
What is Google Tag Manager Container ID?
In GTM, you will find code like ‘GTM-TXAAA,’ which is so-called Container ID.
This ID is used to classify each GTM container tag uniquely, and the other part of this code, which is like ‘gtm.js,’ is the JavaScript library used by the container tag.
Once you add the container tag code to your website, then your GTM is considered to be installed on your site.
Precisely, Google Tag Manager is a container tag.

Setting up a Tag in GTM
Once you have the Google Tag Manager account, the first thing you should know is how to set up a tag in GTM. With this, you can create unlimited configurations of tags in Google Tag Manager.
It helps in creating in-depth reports on your visitor’s behavior, but it can become unproductive if you don’t manage your tags accurately.
For this, Google advises using the following naming practice: tag type – name of the app – detail.
For instance, maybe you name one tagging configuration, “AdWords conversions – iOS – 2018-02 campaign,” and then another, “Google Analytics – CTA – About Us page.”
Through this, you can correctly classify and accumulate the data associated with particular campaigns or your web pages.
For example, the second tag, “Google Analytics – Call To Action – About Us page,” shows how well your About Us call-to-action button is functioning. The information you will obtain is very valuable, and you might lose if you named your tags more generally like “CTA Button”.
Now let’s jump to set up the tag:
Creating a Tag in Google Tag Manager
A tag is a group of JavaScript code that is used to obtain marketing data from your website or mobile app. Then it sends that data to third party services such as Google Analytics, Google Adwords, Twitter, Facebook, Comscore, etc.
How to create a Tag in GTM?
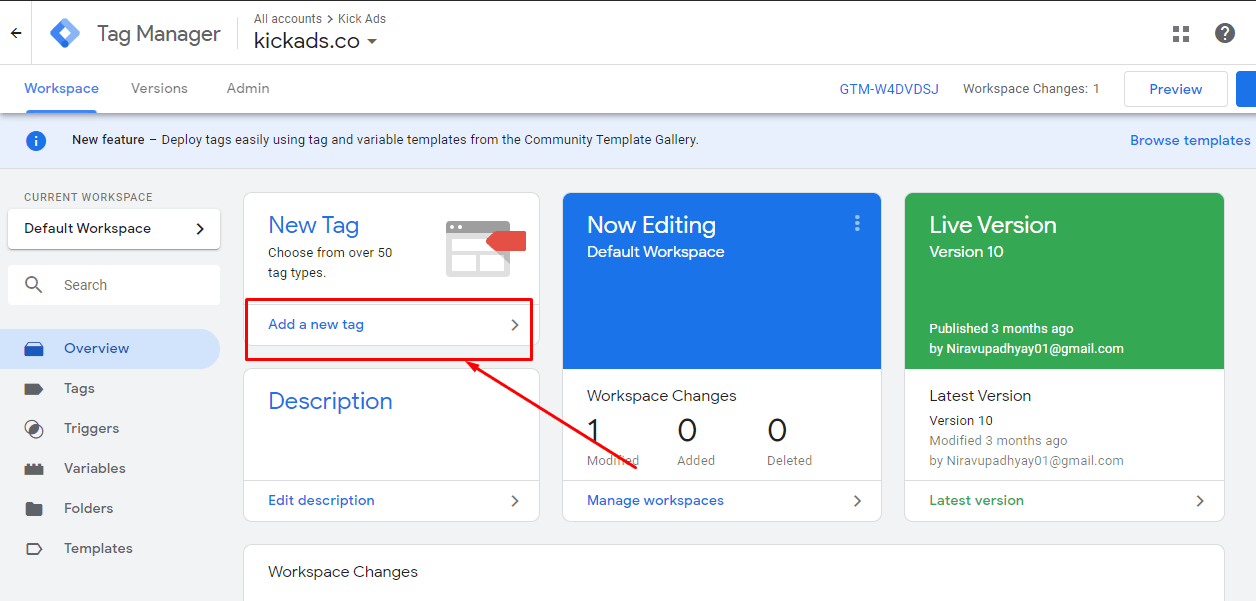
STEP1: Go to the Google Tag Manager Dashboard then click on the ‘Add New Tag’ button.
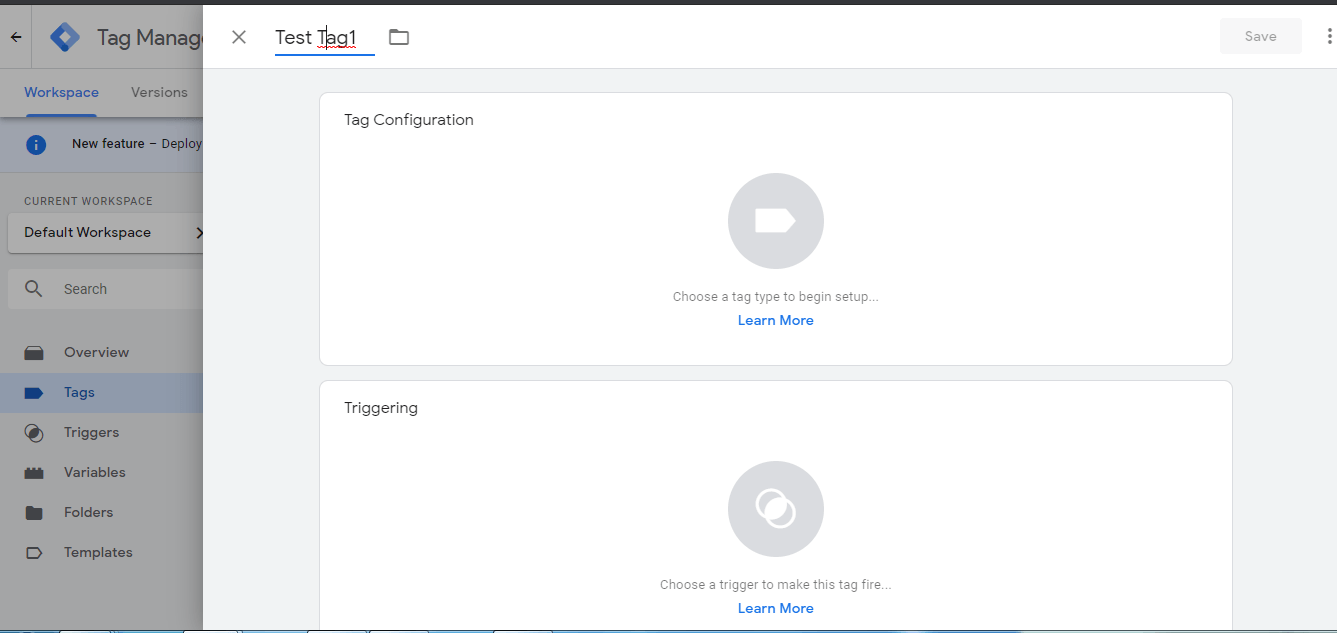
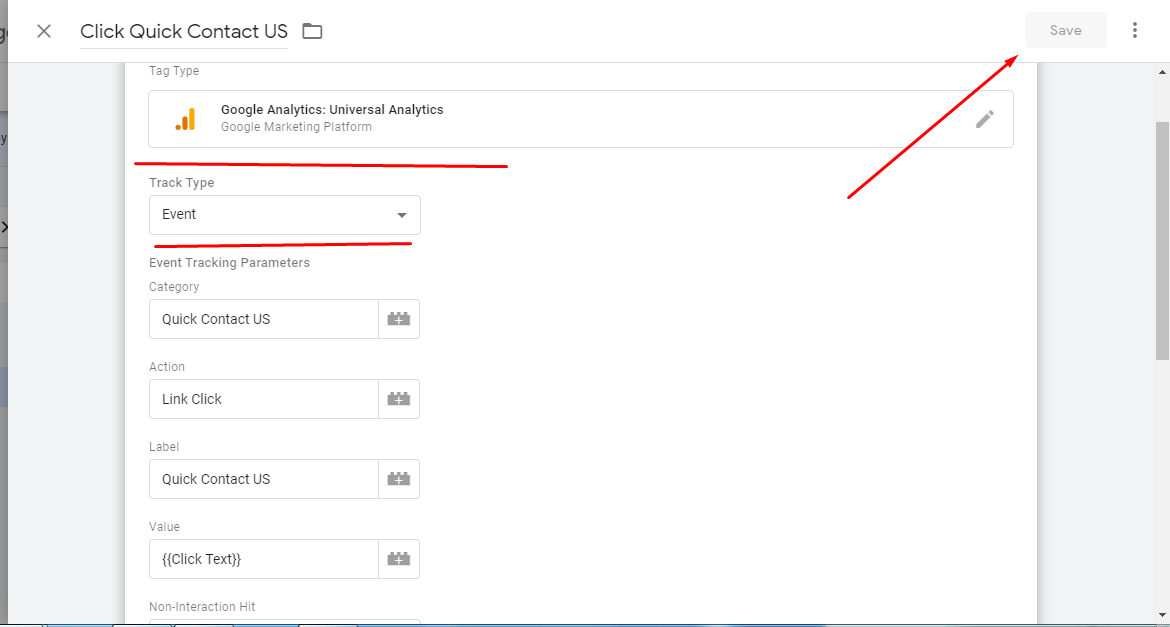
STEP2: Give Title to your tag and then click on the “Tag Configuration’ to choose a tag type.
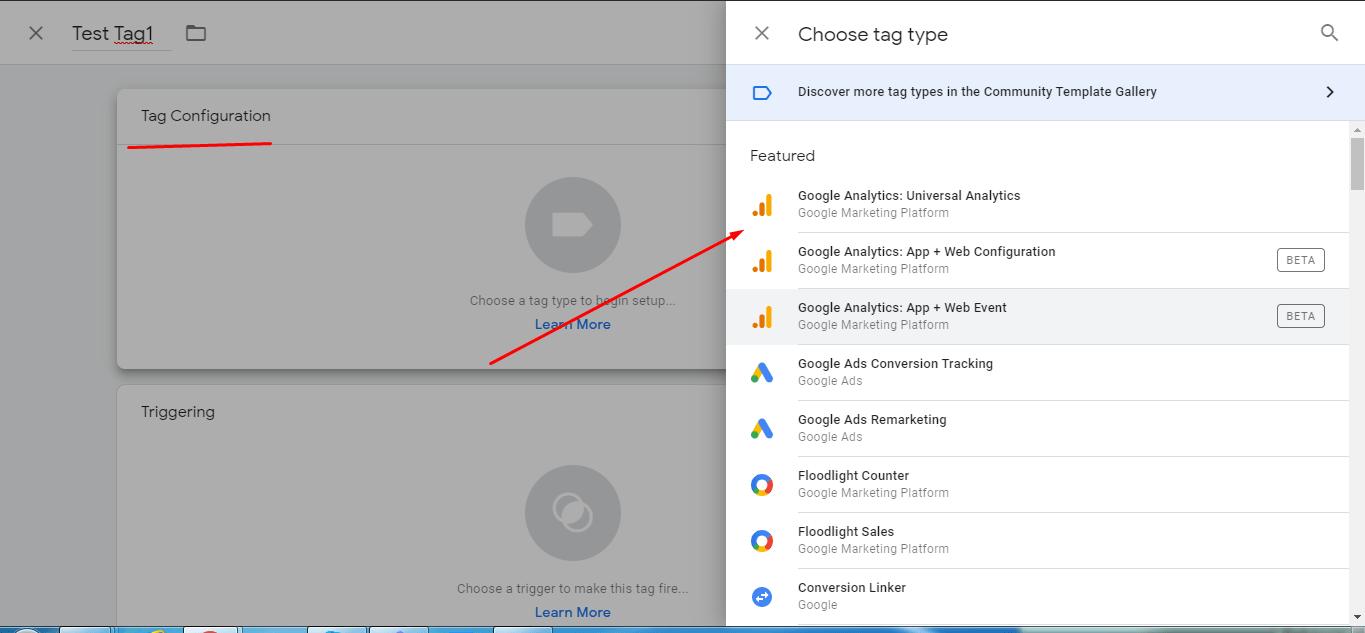
STEP3: There are many tag types, all of them are not mentioned here, and you can also customize a tag type. Let’s go with ‘Google Analytics Universal.’
STEP4: If you want to track your tag in Google Analytics, for that you have to enter your Web Property ID, you can find it in your Google Analytics account. Then, select the ‘Track Type,’ here we are choosing ‘Event,’ but there are other options too.

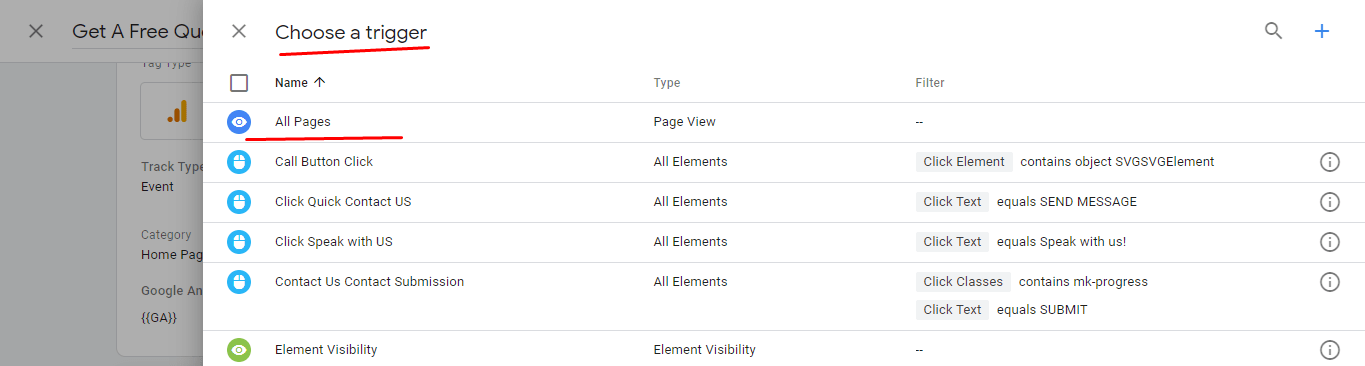
STEP5: Now, choose a trigger; it records the page visits. Here we will select ‘All Pages’ to get the insights every time someone views any of your web pages, you can set it as per your preference too.
STEP6: When you are done with your tag configuration and trigger, then click on the Save button to apply the tag.
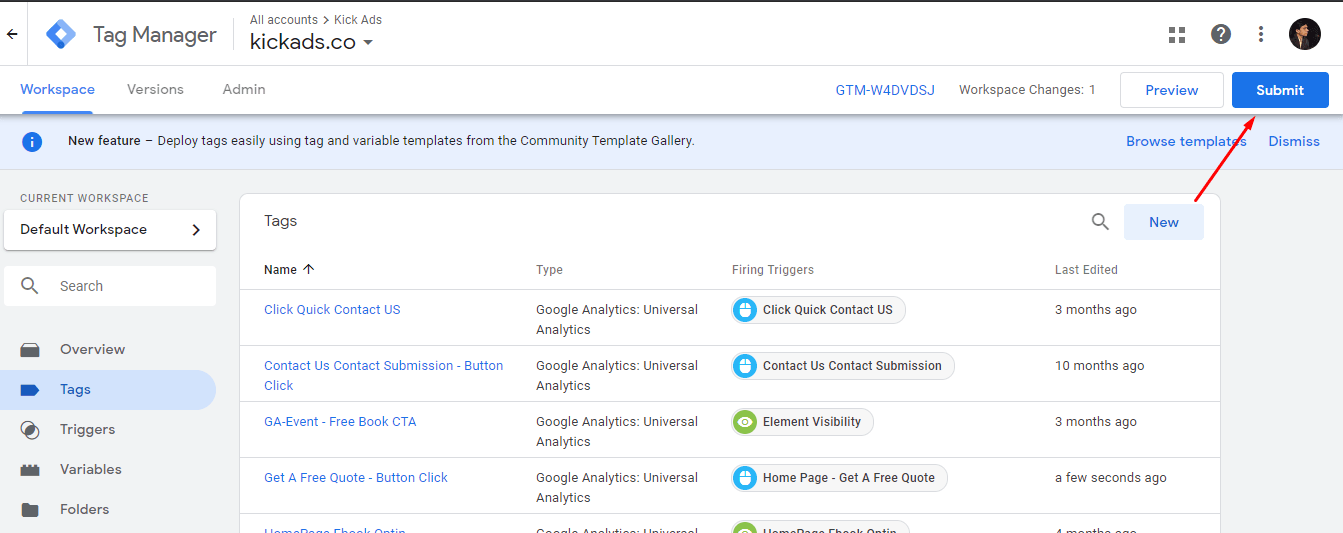
STEP7: Now, click the Submit button so that your tag can work as per your preference.
STEP8: After clicking the Submit button, you will land on the Submission Configuration page, where you will see two options ” Publish and Create Version” or “Create Version.” If you are ready to push the tag to all your site pages, then select the first option ‘Publish and Create Version” and then hit the ‘Publish’ button.
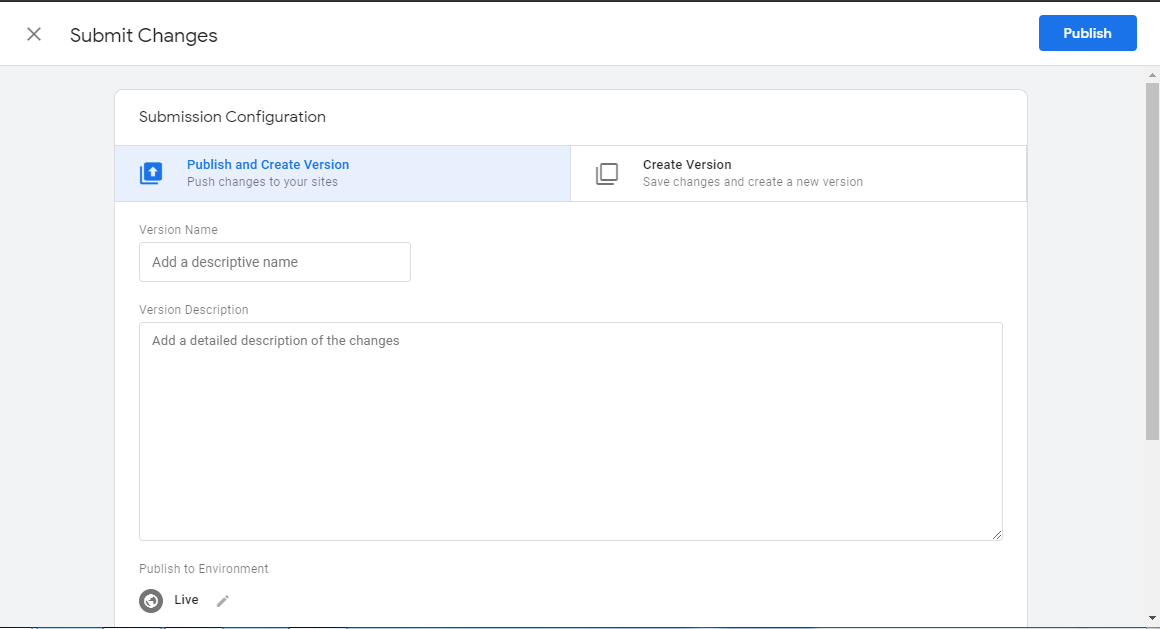
STEP9: After this, you will see ‘Container Version Description.’ If you can keep your tags organized, then add a name and description to understand what you are trying to record with this tag.
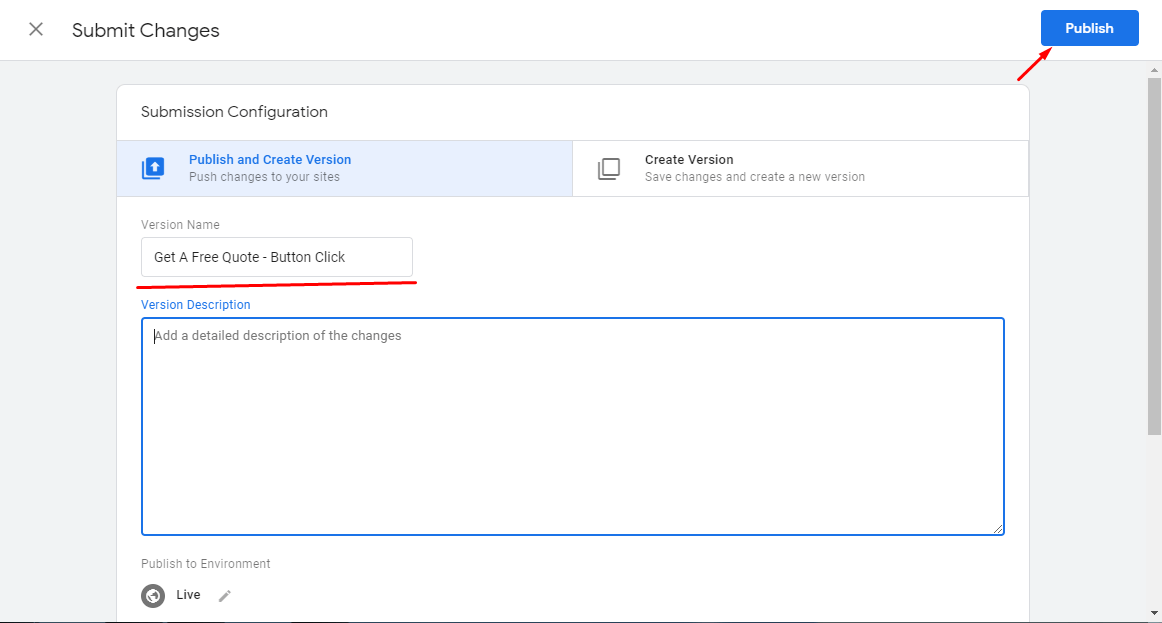
STEP10: Make sure that your tag appears in the ‘Version Summary’ report.
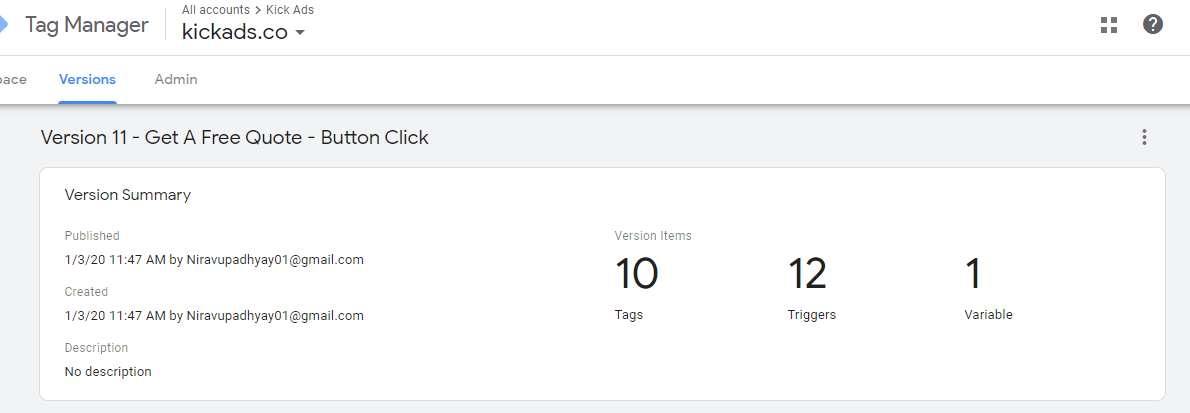
Now we have created the first tag successfully.
Google Analytics and Google Tag Manager
If you want to use GTM in connection with Google Analytics, there are a few steps that you need to take. Though, it is a worthy effort, adding these tags in your site will increase the precision of your GA reports.
In the first step, you have to remove the Google Analytics code from your site pages. For this, you will need to include your GTM tag code. If you include both codes, then it will just duplicate the data.
In the second step, you need to create a variable for your Google Analytics Tracking ID. Variable increases the efficiency in the GTM tool; it increases efficiency by saving additional data.
If you keep your GA Tracking ID as a variable, you won’t have to look it up all the time; you need to create a new tag for Google Analytics.
What is a Trigger in Google Tag Manager?
You can define a trigger as a set of rules that tells your tag when to start firing. The primary trigger in Google Tag Manager is the all pages trigger, which tells your tag to fire on every page when the page loads. This trigger is used with the Google Analytics tag.
Built-in GTM Trigger
There are many built-in triggers in Google Tag Manager that you can use to fire the tags. GTM has triggers for YouTube videos, custom events, scroll depth, button clicks, and more.
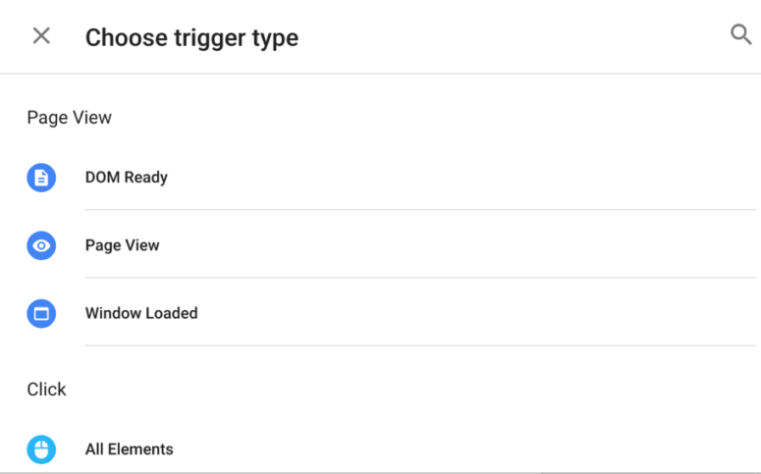
Every trigger in GTM uses its own set of rules for firing the tags.
For instance, you can set up a YouTube trigger to fire based on many different interactions a user performs on your videos. You can fire this tag when a user starts, seeks, pauses, buffers, or finishes the video. This tag can also be fired on a user’s viewing completion, such as the user viewed it 50% or 3 minutes watched.
Creating a Variable in Google Tag Manager
In GTM, a variable is a function called from within another tag, trigger, or variable, and it is of two types one is Built-in variable and user-defined variables.
How to create a variable in GTM?
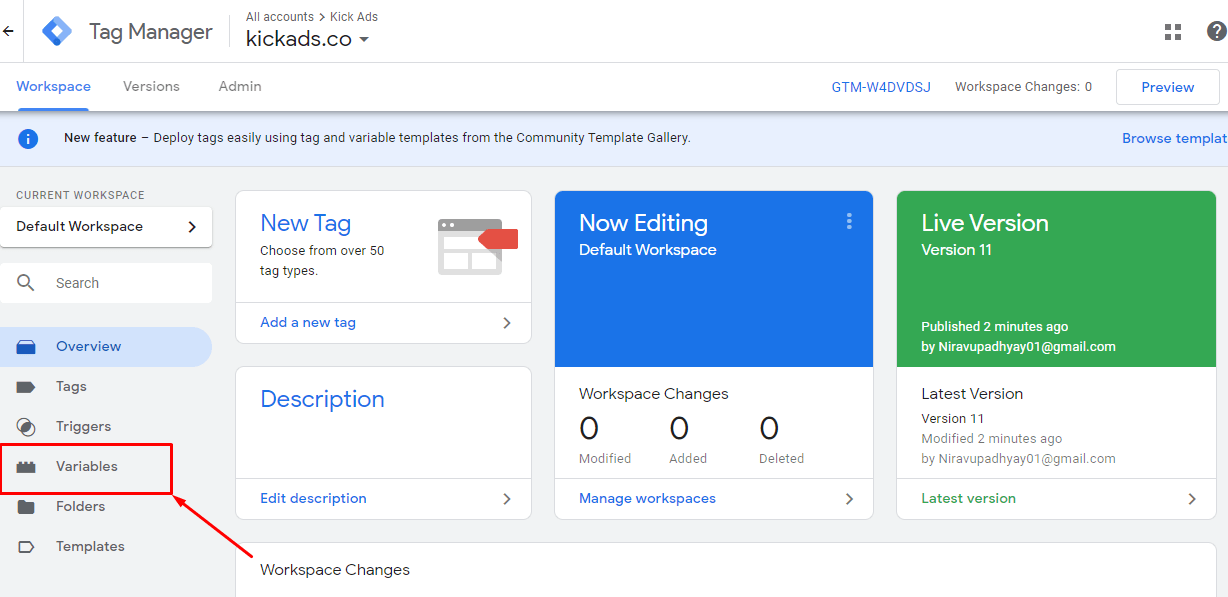
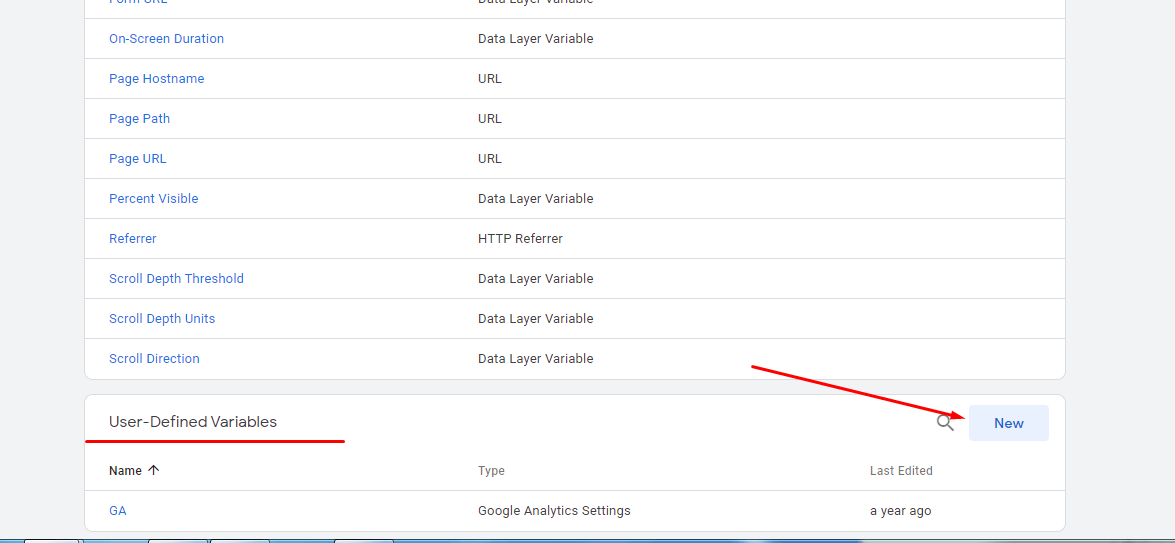
STEP1: Click ‘Variables on the homepage of Google Tag Manager.
STEP2: Go to ‘User-Defined Variable’ and then click on ‘New.’
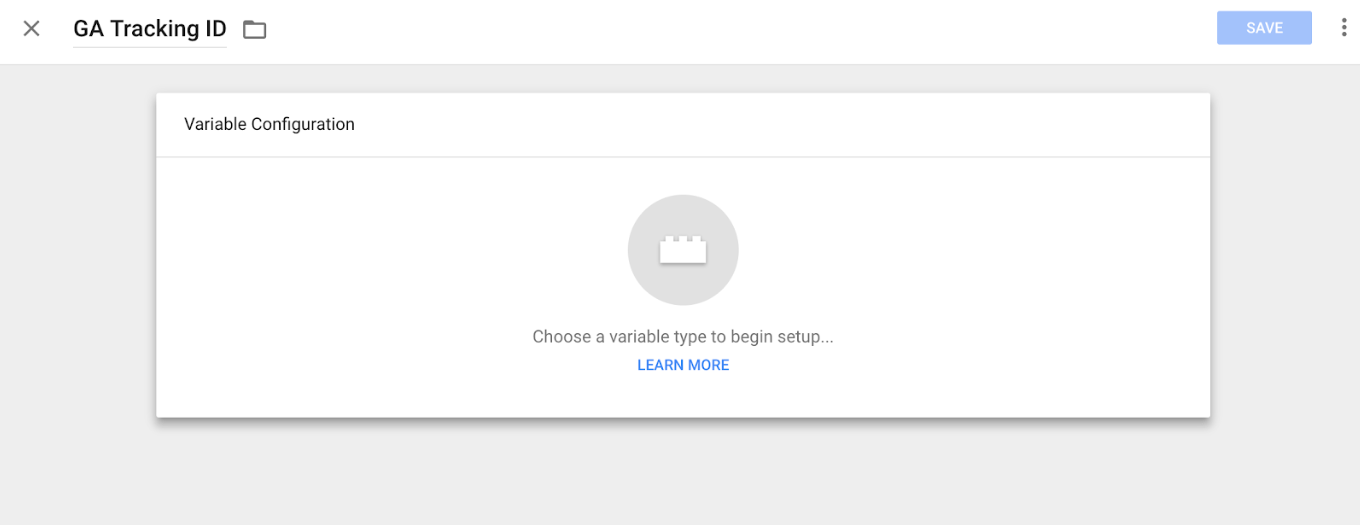
STEP3: Now, you have to name the variable so you can remember it. Then, click the ‘Variable Configuration.’
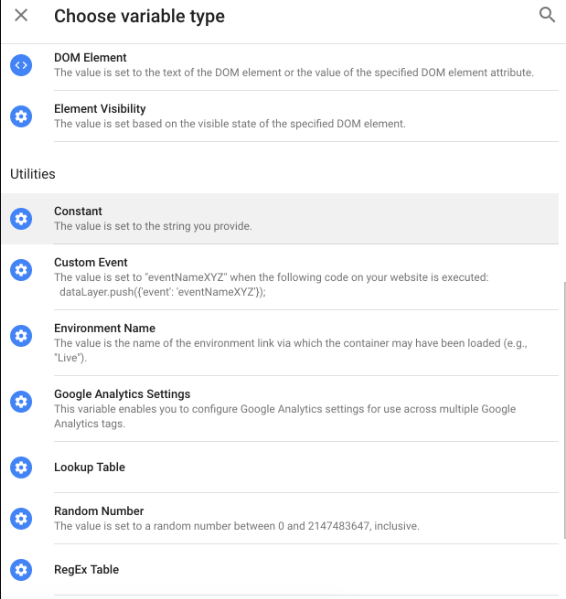
STEP4: choose the variable type as ‘Constant,’ if you don’t want the ID to change for different tags.
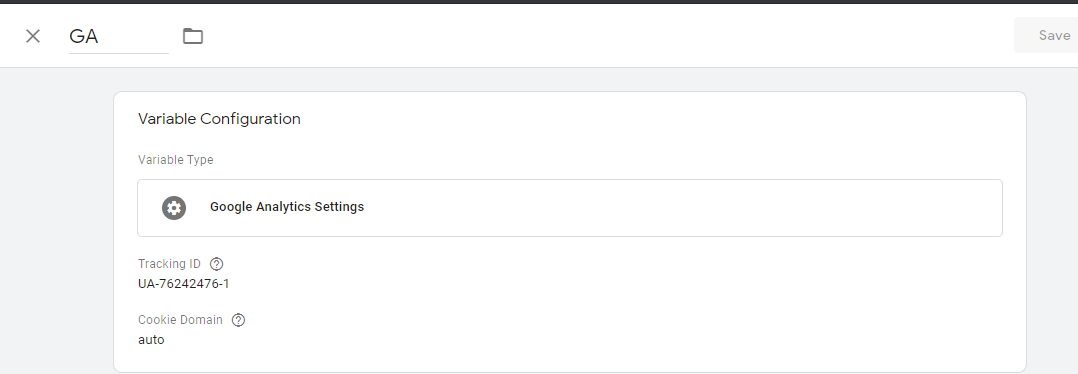
STEP5: Now you have to enter the Google Analytics ID number into the ‘Value’ box, and then click the ‘Save’ in the top right.
In the next step, edit the ‘TestTag1’ and include the new variable we created.
Data Layer Variables
If you want to learn about your user behavior, even more than you must use the data layer. Google Tag Manager gives the ability to create custom data layer variables.
These data layer variables can pass the dynamic values from your CMS, back-end system, or e-commerce platform into GTM. Then GTM can record these values in your tags and pass them on to your reports. This variable can pass critical values to all your marketing systems at once.

What’s your opinion about Google Tag Manager?
Google Tag Manager can clearly make your life easier. Ensure that you are using the data that you are setting up in GTM.
I am curious to hear about your experience with GTM. How was it? For any queries and suggestions, do comment.
Stay tuned for more such articles.
Ready to grow with Google Ads?
KickAds is a certified Google Partner agency in Hong Kong. We manage paid media for HK & Malaysia SMBs — data-driven, ROI-focused.


